Last weekend I went through a frenzied day of what I thought was totally inspired designing – draping a skirt which was intended to have a cool, drapey-bias front with a wrap style. Turns out that was WAY too much concept to put into a garment, and it ended up looking like a utilikilt. So as not to waste the good job I did of drafting the back, I remade the front as a simple pencil skirt but then I ran out of time for hemming and putting on a waistband. Then I found some pretty pink fabric to make a matching blouse out of, and this morning around 6:30am my brain started jamming on the idea of a blouse dress.
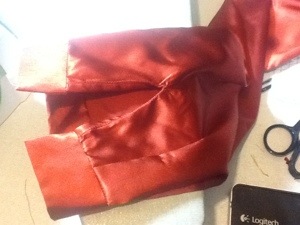
Climbing up into my loft after breakfast, I began tidying up the space enough to work on this and came across a rust colored crepe-backed satin which I decided was much more appropriate for autumn. I have draped it on the dress form with the skirt on bottom to see how it will look. I’m deciding between using the shiny side out or the matte side out. Here’s how it looks:
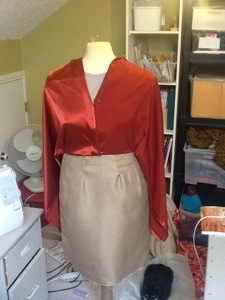
Hubby is of the opinion that the shiny side will look better so I’m going to cut out the pieces assuming that will be the way I go, but I can always change my mind before construction and flip it all around. I want to make a tie-neck blouse this time, like I’ve seen Robin Wright wear on House of Cards, because I think it will be a really flattering look… and I’ve never done it before.
Updates to come as I progress.
Update 1: Truing Up the Fabric
Sewists learn early that you have to lay out your pattern pieces with the fabric as straight as possible to get the grain right in the pieces. Now, when I went to lay out my fabric today I found this weird little anomaly. 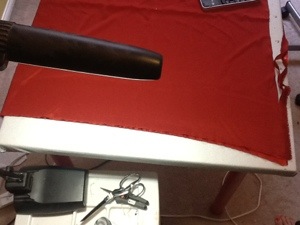
See that there edge? That’s a ripped edge, meaning it should have parted ways with its bolt on a straight line across the grain. Yet, we have that unsexy curve. Somewhere along the way this fabric has gone horribly askew. So I am cutting off the selvage in hopes I can iron it out so the grain is straight again.
After pinning the edges square to my cutting table (an Ikea desk covered with a layer of compressed batting and thermal-coated canvas) and diagonally ironing the creases over and over for about 10 minutes, I achieved this:

I pulled a thread across the grain at one end so I could make sure I wasn’t just dealing with a poorly-cut fabric. I think what happened here is the fabric was rolled onto the bolt more tightly at one side of the fabric than the other, and then it sat there for who knows how many months in the supply chain (and about 6 months in my loft). So a wee bit of pre-work before laying out my pattern pieces has saved me misery and disappointment with my finished garment. It’s not perfectly straight now but it’s a darn sight better and I’ll feel better knowing that I did what I could to get better results. And now, onwards to pattern-cutting.
I’m planning on using Vogue 2426 for the bodice block. This is an out-of-print pattern but you could use pretty much any basic bodice pattern or draft your own. I just happen to have used this pattern for three projects recently. I had added a bust dart to this pattern and with a bit of tweaking for added ease (this fabric should be allowed to drape generously) it should do the trick.
Update 2: Reaching the Stage of Despair
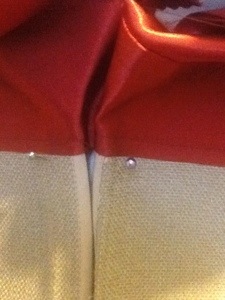
Damnit, this is not going according to plan.

What’s happening here is I’ve got to line up the darts on the top and the skirt, and they weren’t designed or drafted at the same time. I’ve moved front darts on the skirt but there is still excess fabric in the front.
I think this was a little too much for my skills. I think I have two options here: 1) Try to finish this thing by basting top and bottom together and crossing fingers. If I do that option, I still have to work out the sleeves, cuffs and neckline on the blouse part. Option 2) I take the skirt off the top and put a waistband on it, hem it and put the zipper back in. Not in that order of course.
I’m hot as heck up here in the loft, and I really wanted to wear this project tomorrow. I also wanted to have something to show at the Saanich Fair. Waa waaaaaah.
Update 3: After all this bloody time…
This is what I’ve come to…

The top and bottom are together and with the addition of a waistband, it seems to be approximately the right length for the skirt to sit at the place on the body where the dart shaping aligns with body shaping (I put it together a first time without the waistband and it was too short – the darts floated away from the body. Hell’s bells). A success, right? And the neckband seems to be quite simple and straightforward. Haven’t got onto the sleeves yet but that will hopefully also be quite straightforward.
The damn thing is now too small around the waist. If I put the zipper in the way it is now, I’m not going to be able to do UP the zipper. In the process of getting the top to fit into the bottom, I had to take a couple of extra darts in the skirt, forgetting that I actually had a skirt that fit quite well. SHOULD HAVE JUST PUT IN A WAISTBAND AND CALLED IT A DAY.
We are not amused.
Update 4: Something for the closet?
Well, the zipper is in. Fairly well, if I dare say. But I was right, and the fit is just a little bit on the tight side around the bust and waist. Well I was planning to lose a few pounds anyway. I won’t be wearing this to the office tomorrow damnit, but I will finish it off this week and enter it in the Saanich Fair (where fit isn’t considered because they don’t put the garments on the people!).
I used a new gadget to put the invisible zipper in: a plastic invisible zipper foot.
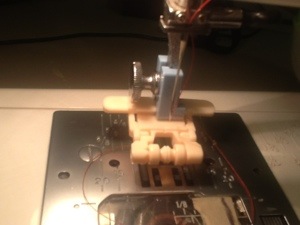
I got this gadget from Fabricland today when I was there buying my zipper. (For the record, the zipper I got was 5-7cm too short so I’m going to have to create a keyhole at the back with some buttons around the collar. Dang dang dang!) The zipper foot rolls along over your invisible zipper and holds it open so the stitches get right in close to the teeth. It really works – the stitching is so close to the teeth that it doesn’t actually slide very well, but I hope I can fix that.
Update 5: The Universe Does Not Like This Dress
I got the sleeves cut out, the sleeve opening bound with a self-fabric continuous binding, and the cuff put on (finished with handstitching, no less).
Then I thought “hey let’s put this puppy on my arm and see how it looks!
O.M.G. Foxtrot. Sierra. Foxtrot. The arm opening will be too small once it’s sewn into place. The bicep will be too tight and the cuff is way too large. It’s like a reverse sleeve. And I don’t have any more of this fabric to cut new sleeves.
Off I go to Fabricland to try to get more. They’re sold out. So I’ve got something almost the same colour, and I’m going to try to make either a facing or bias strips to bind the armhole instead of putting in sleeves. At this point I’m torn once again between just tossing this whole thing in the bin, and finishing it because BY GOD IT WILL LOOK NICE.
I like to entertain torture myself by thinking about the other things I could be doing with this spare time. The other projects I could be sewing. Why am I so in love with this dress that I persevere despite so many ridiculous setbacks? I don’t know. I think I might need to do some soul-searching about this one.

The sleeves are at least big enough pieces of fabric for me to cut out facings that will match the rest of the dress.
Update 6: Are We Done Yet?
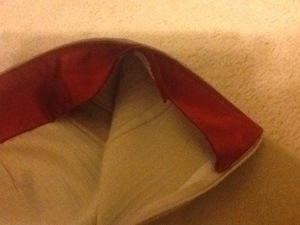
The facings are in the armholes. I guess when you draft facings you should make it so they aren’t quite as round on the outside. Or maybe when I finished the edges of the facings, I stretched them. Anyways I now have frilly facings. *bang* *bang* *bang* What’s that, you ask? That is my head beating against the wall.
The next steps (for tomorrow evening, the fifth and last shift I will put into this godforsaken garment) are to put on the other collar tie, figure out how to put some buttons at the keyhole neck to make it look like I did that on purpose and not because my zipper was too short, and to figure out a convincing way to make the skirt longer. I had considered inserting some piping from the top of the blouse and then another tier of the skirt fabric. I don’t think I have enough left of the blouse fabric to make even an unpiped insert. Just adding another tier will make it look dumb. Perhaps I’ll leave it short and just hem that mo-fo and call it done.
I think I’m coming down with something, too.
Update 7: Hacked Off. It’s a Skirt.
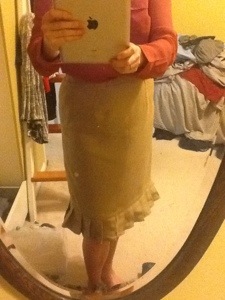
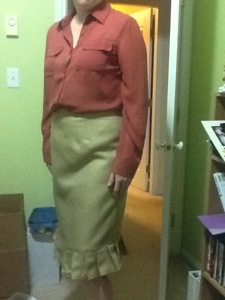
Aside from these photos being evidence that you shouldn’t take photos indoors late at night (which is why my head is cut off cuz I look haggard), I think they do an okay job of showing what I’ve done here. Basically, ditched the idea of a blouse dress entirely and made it a pencil skirt with a row of pleating at the bottom to give it added length (necessary for work attire).
What I did for the waistband was actually leave the belted part of the satin fabric attached and just cut off the blouse itself. It’s probably not going to win me any points at the Saanich Fair for finishing, but it is DONE. I don’t even know if I’m going to enter it at this point. I’ll decide tomorrow evening after reviewing what other items I have to present. That’s another blog post though.
Final Assessment:
I do like this gold fabric. It is good for shaping and holds a fold quite well. It’ll be a while before I get back to it to make the matching suit jacket though, because I’m a bit burned out on sewing from this. I think I’ll take a two week break … long enough to get the itch to sew again.
I think I like the finished garment. It’s good enough to wear to work and that’s what I wanted. It’ll look great with brown boots in the autumn and spring, and sandals in the summer. Hurray.
I’ve also learned that I should have a complete plan for a garment before I start whacking away at stuff. Plan twice, cut once.