Greenstyle came out with a new top and the social medias are ABUZZ. People are sewing it up ALL OVER, including me. Proof that I am learning a few things as I age: I decided to make my first version in a fabric that I’m not saving for something special! Not that anything made by me isn’t special, but YOU KNOW WHAT I MEAN. I have 1m of the Paint Drops Breathe Tek athletic, and damnit I will not end up unhappy with what I make from it. So instead, I’ve used some Chitosante Extreme in Moroccan Blue to make a first try and see what I like or don’t like about it.
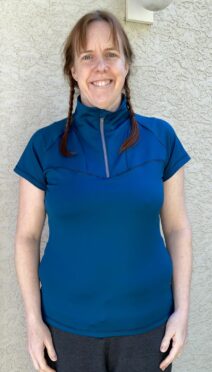
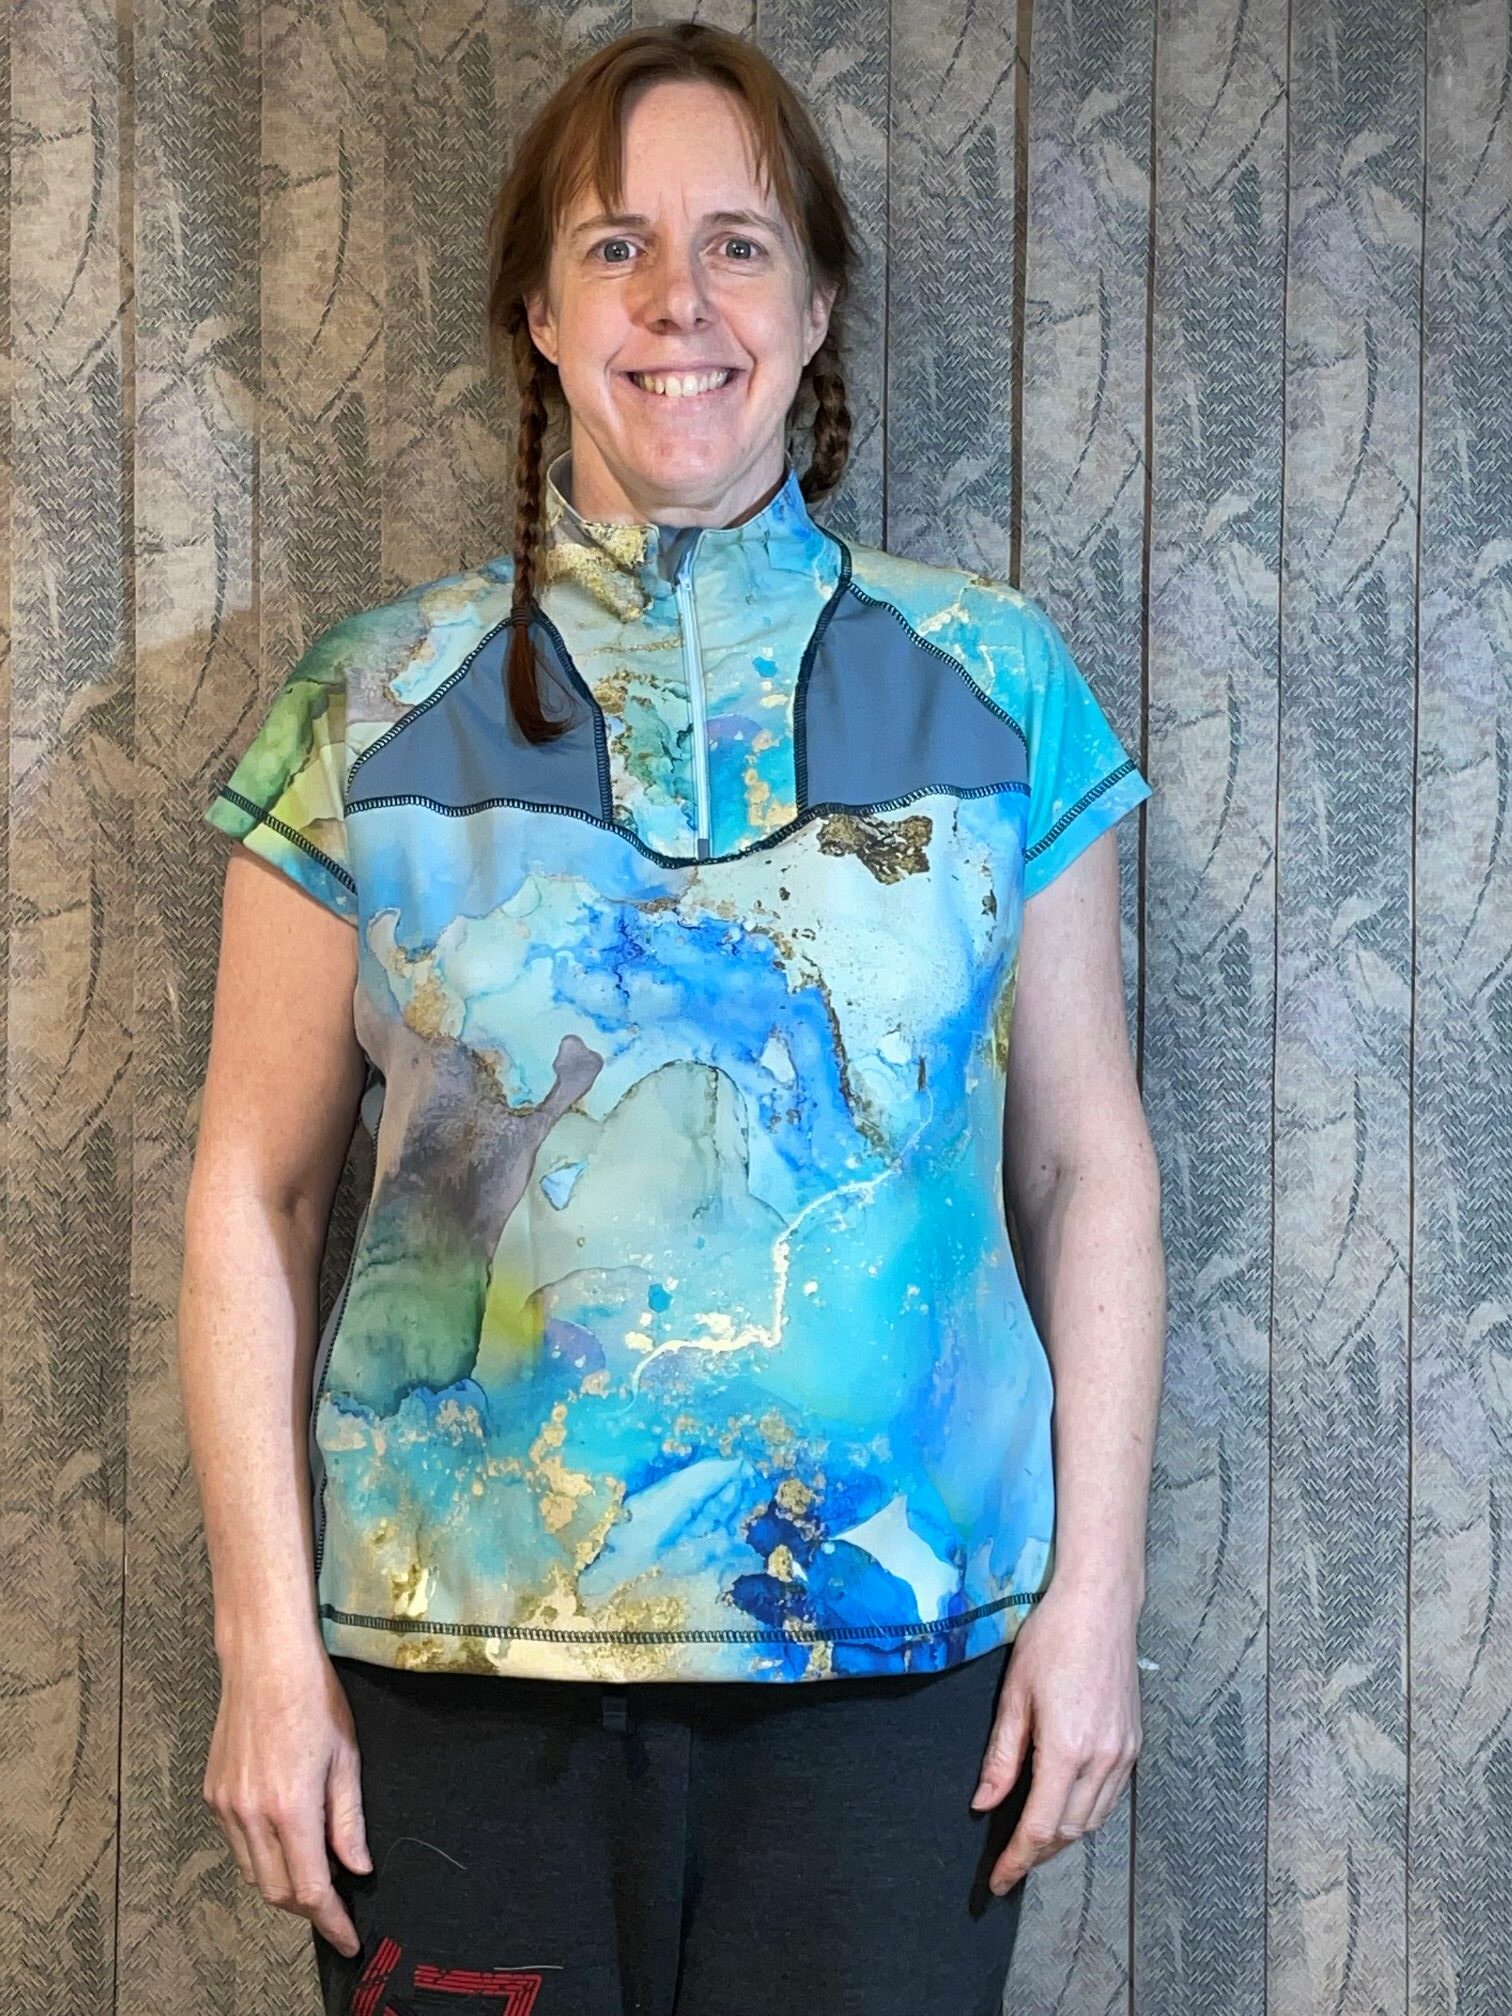
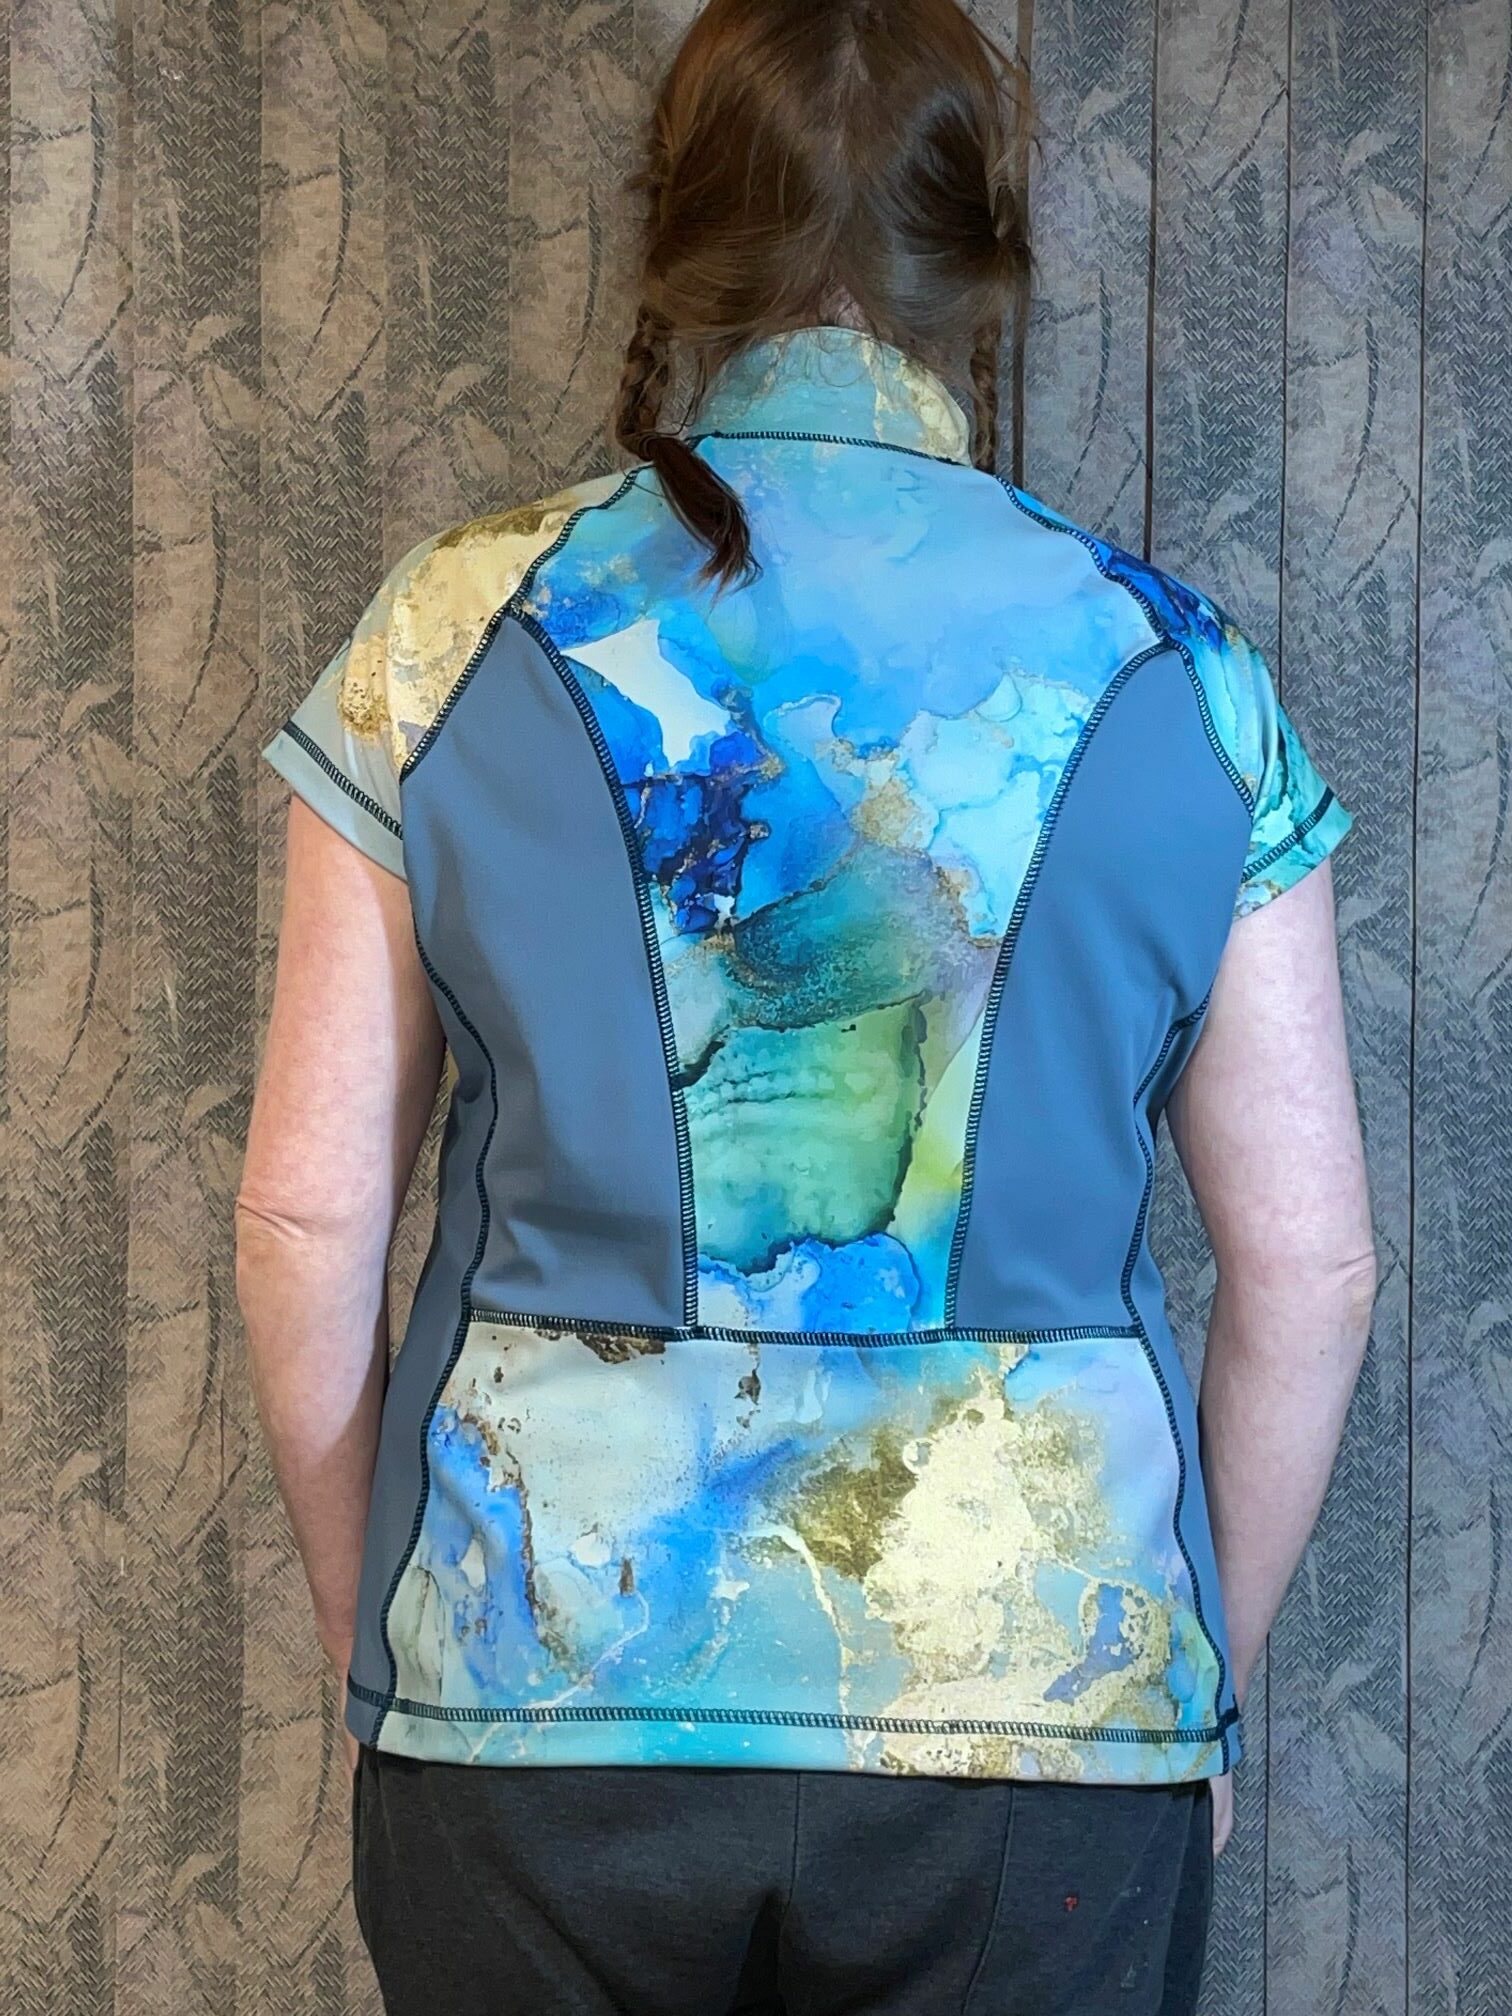
Here is my first go-round:

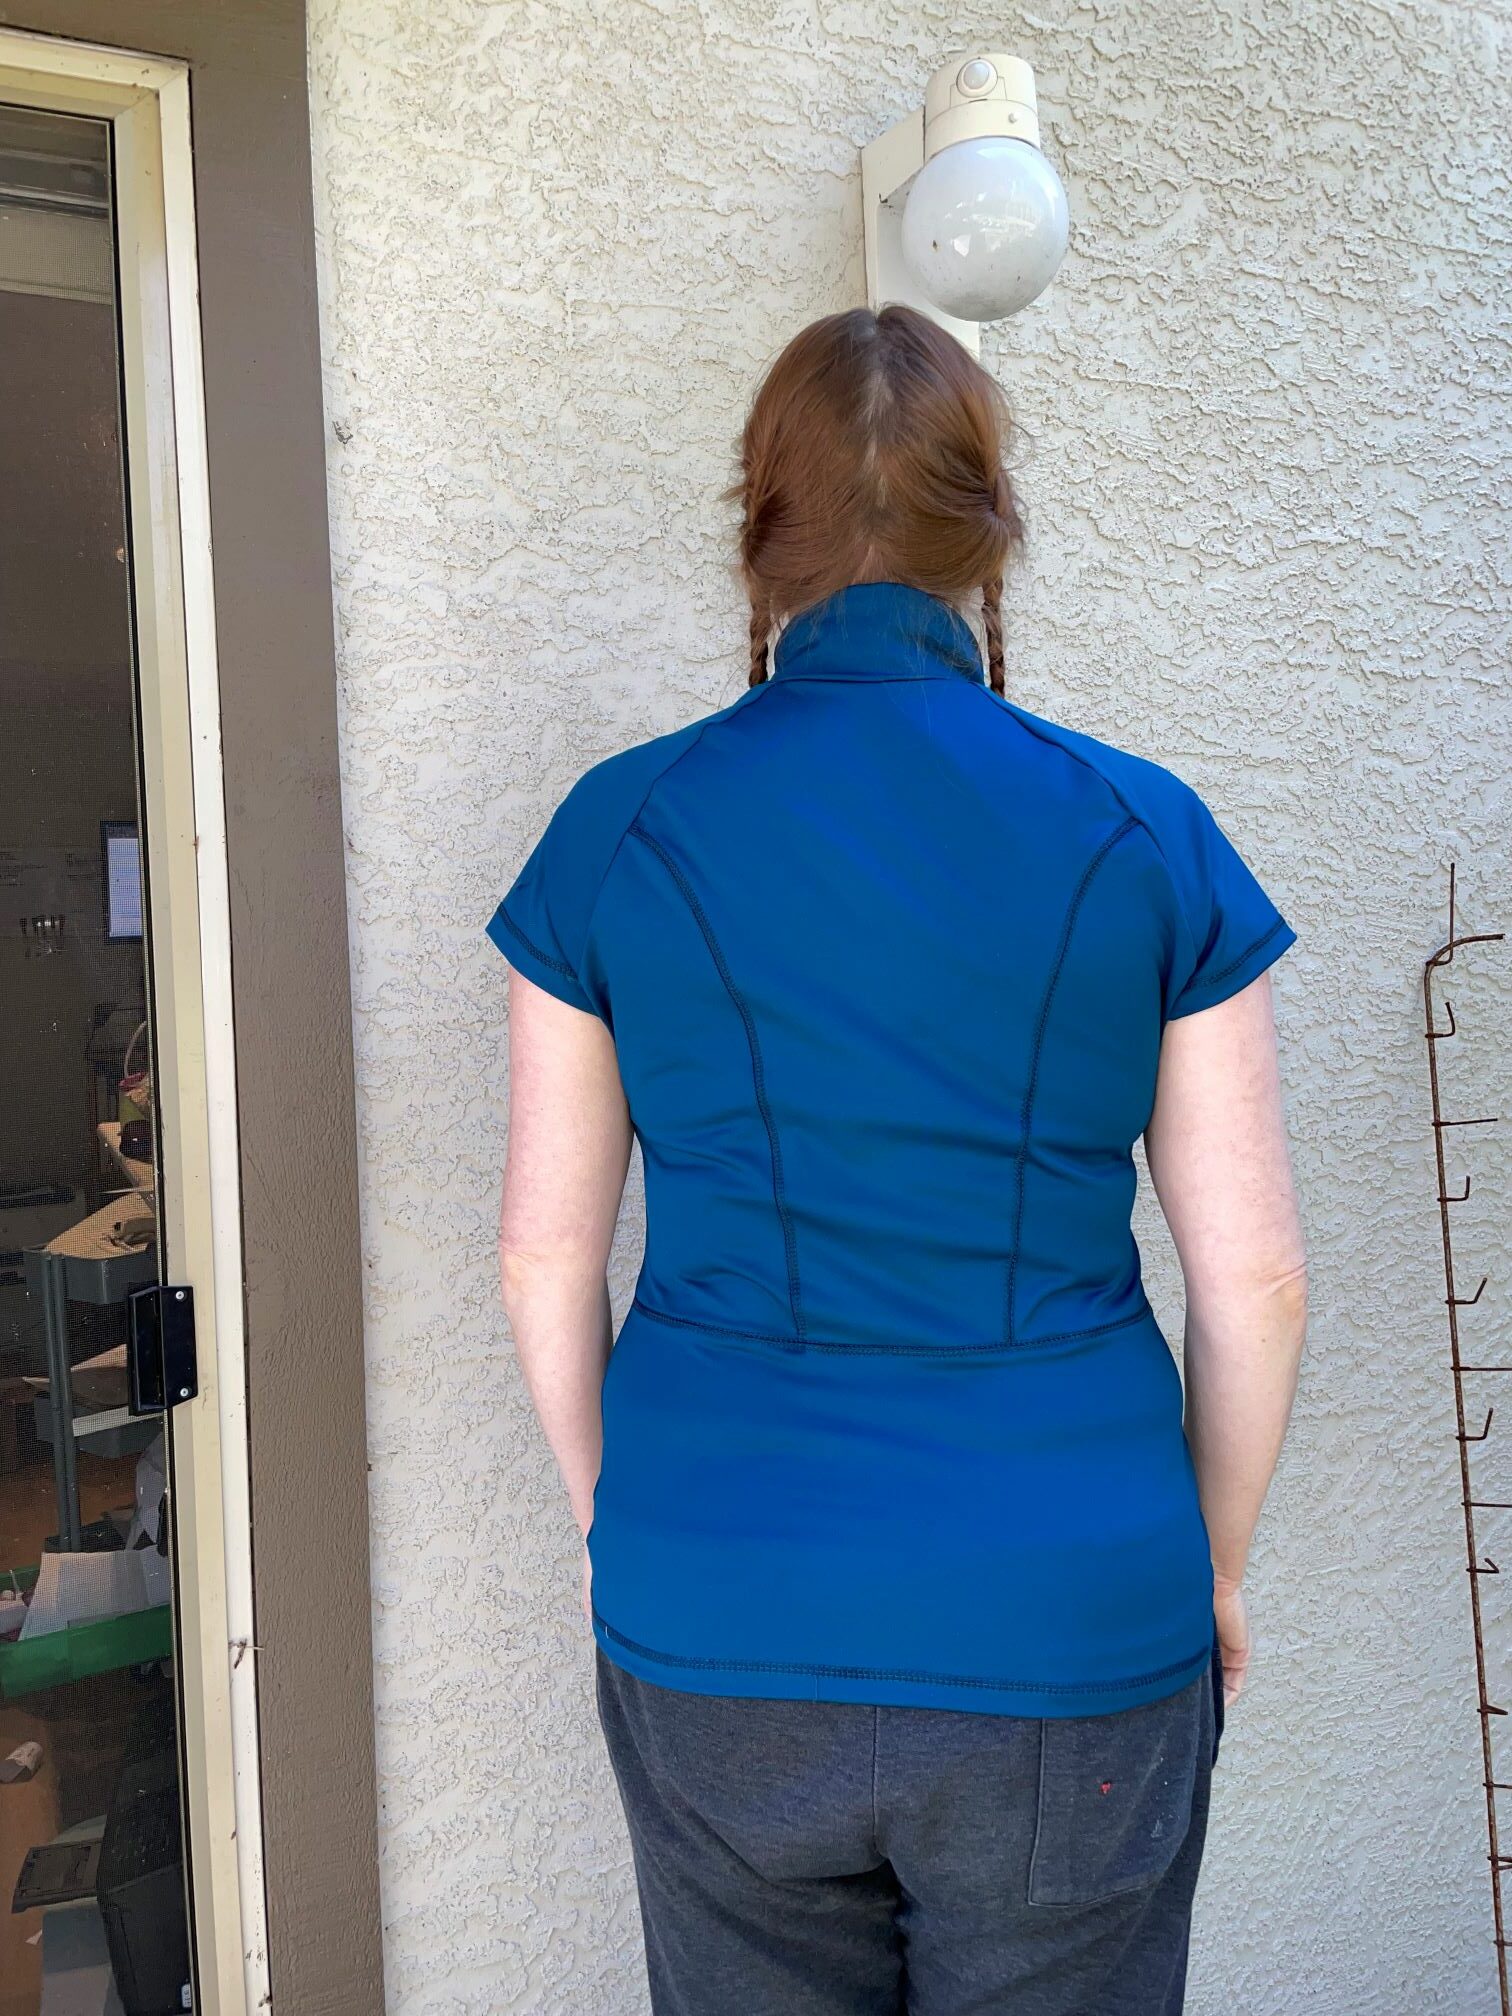
I noticed a few things right away. First, these sleeves do not fit me — that is fairly common for raglan sleeves. Second, the collar is far too loose around my neckline. When I took photos and looked at the back view, I can see that I probably need to take some length out of the upper back. And finally, while this fits and looks good on me right now at the waist, it is not going to be forgiving if I gain a few pounds or use fabric that has less stretch.
Here’s what I’m going to do about it:
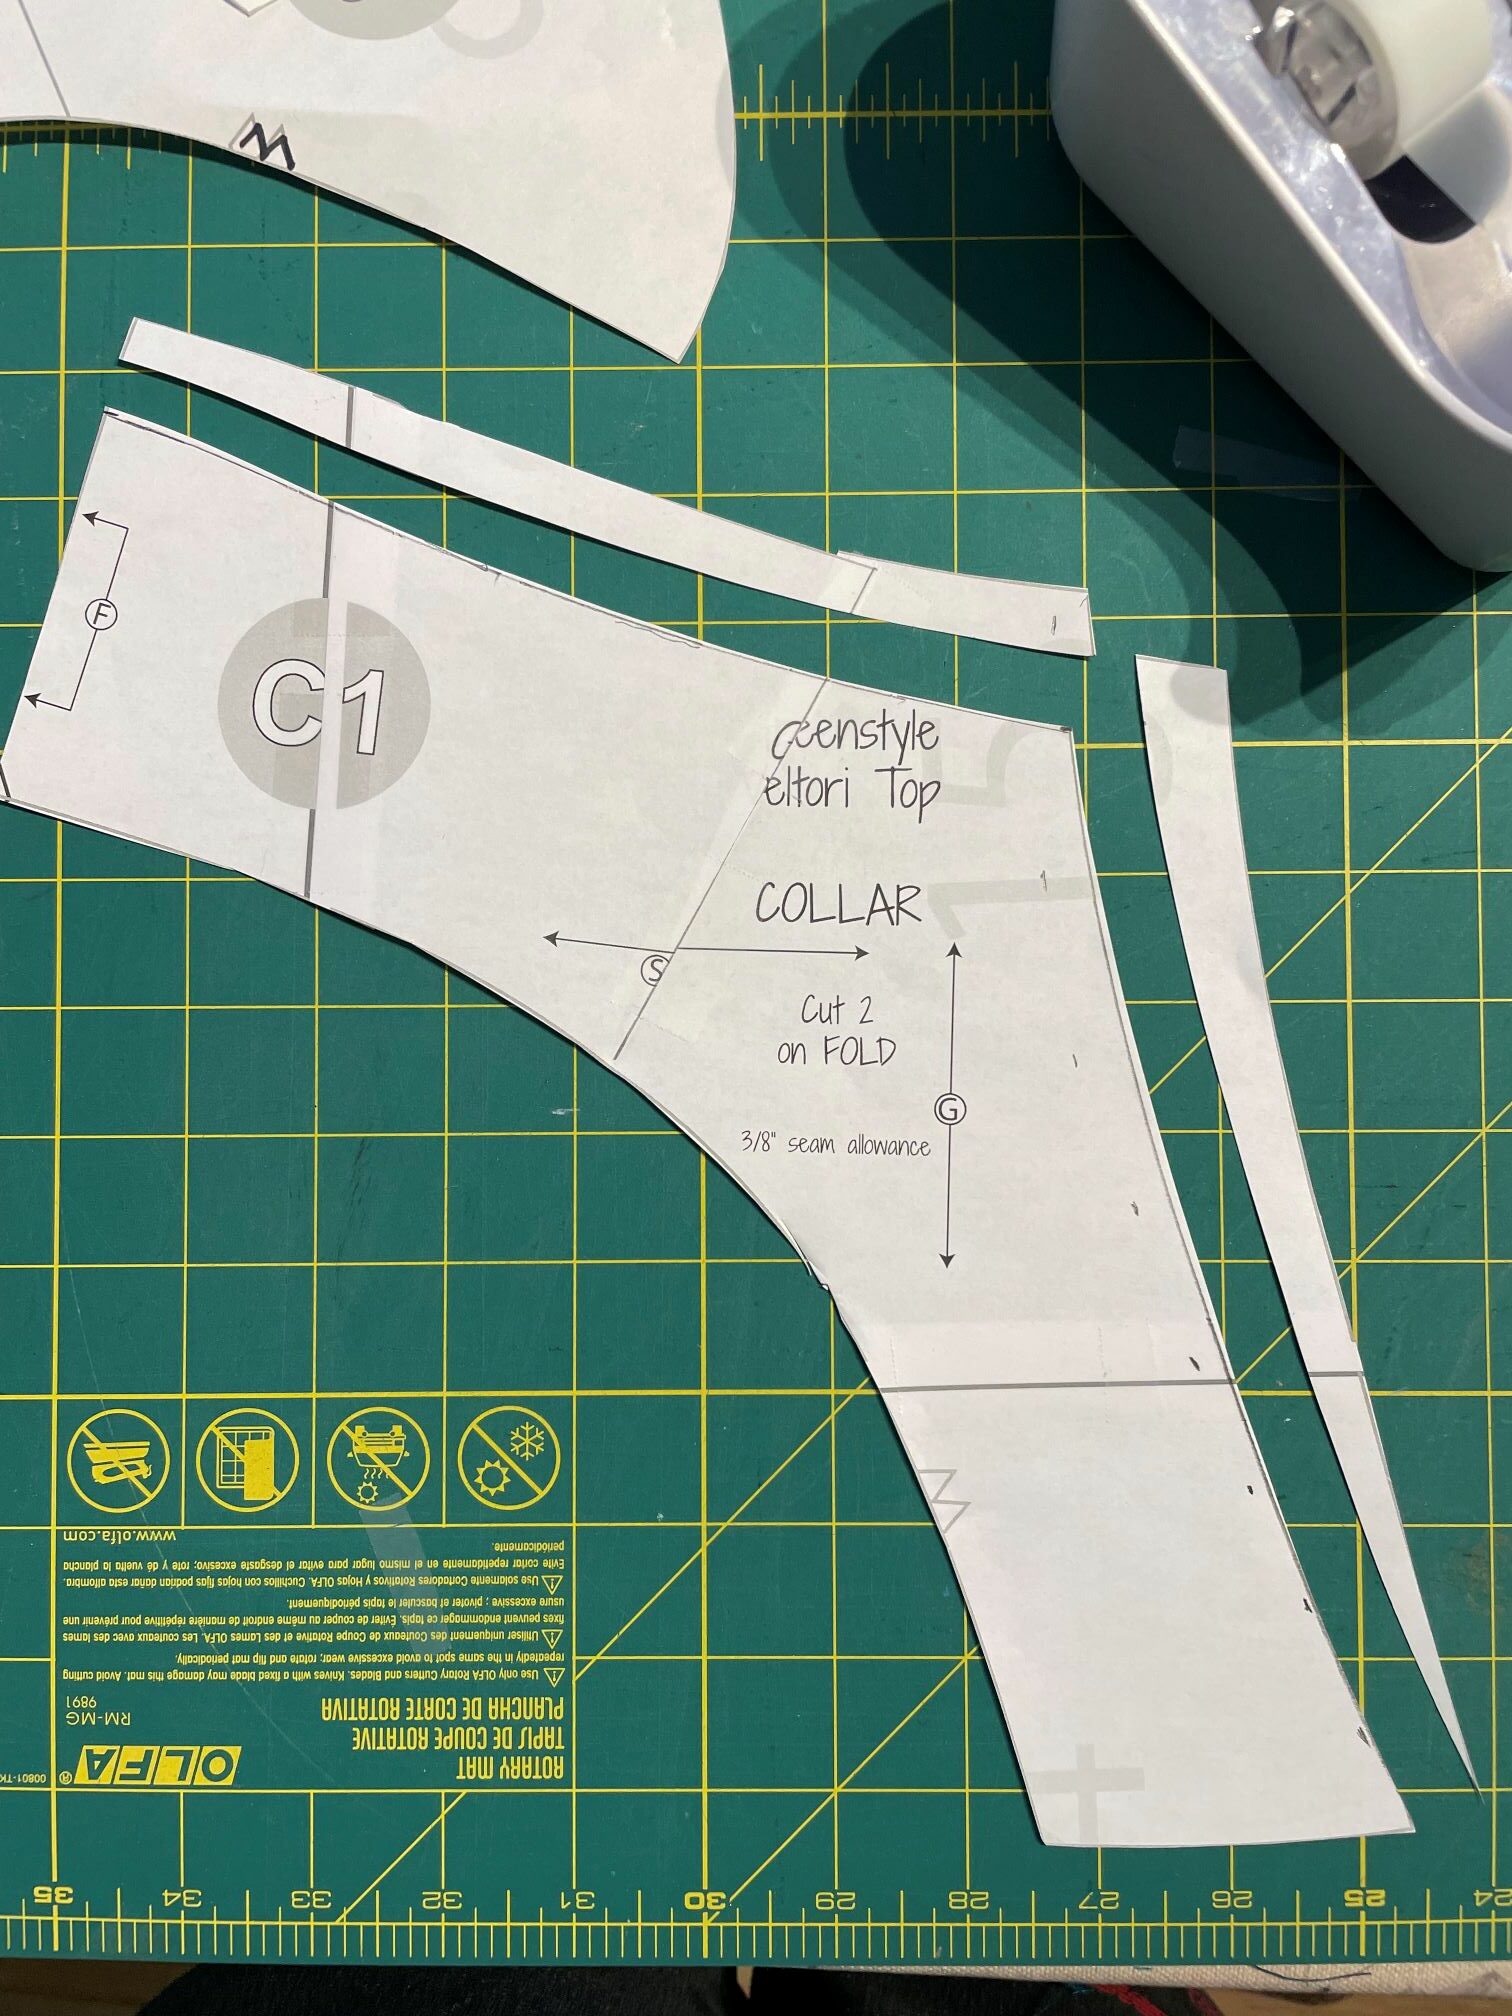
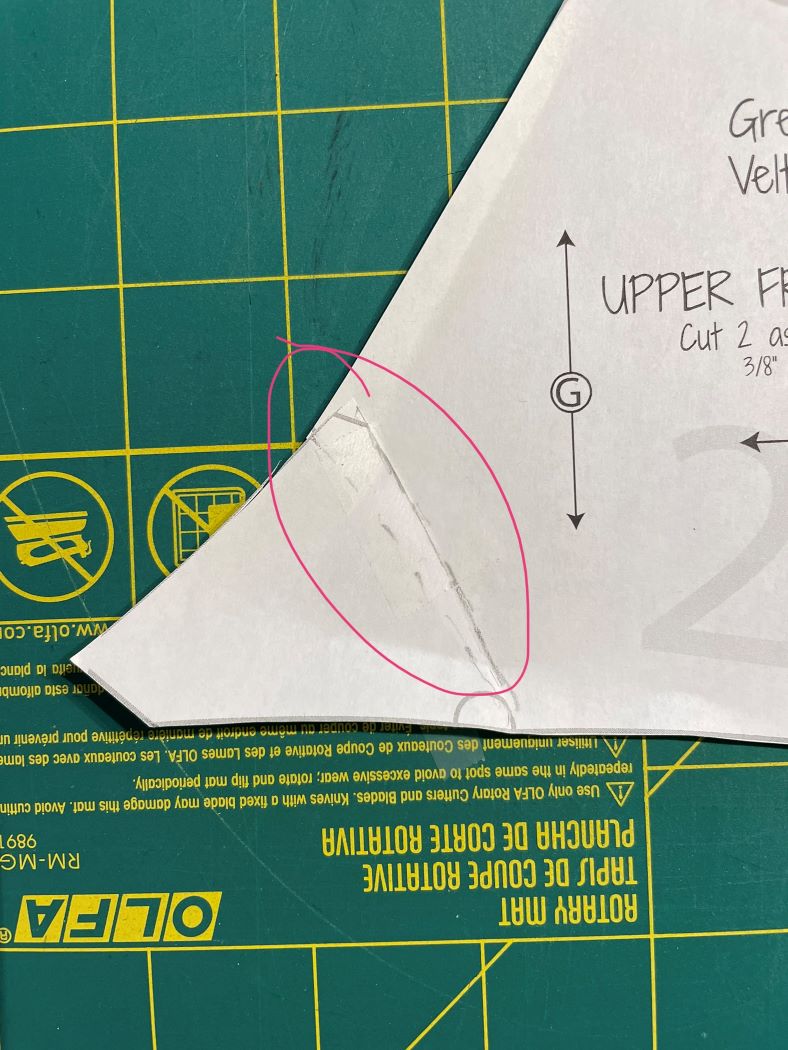
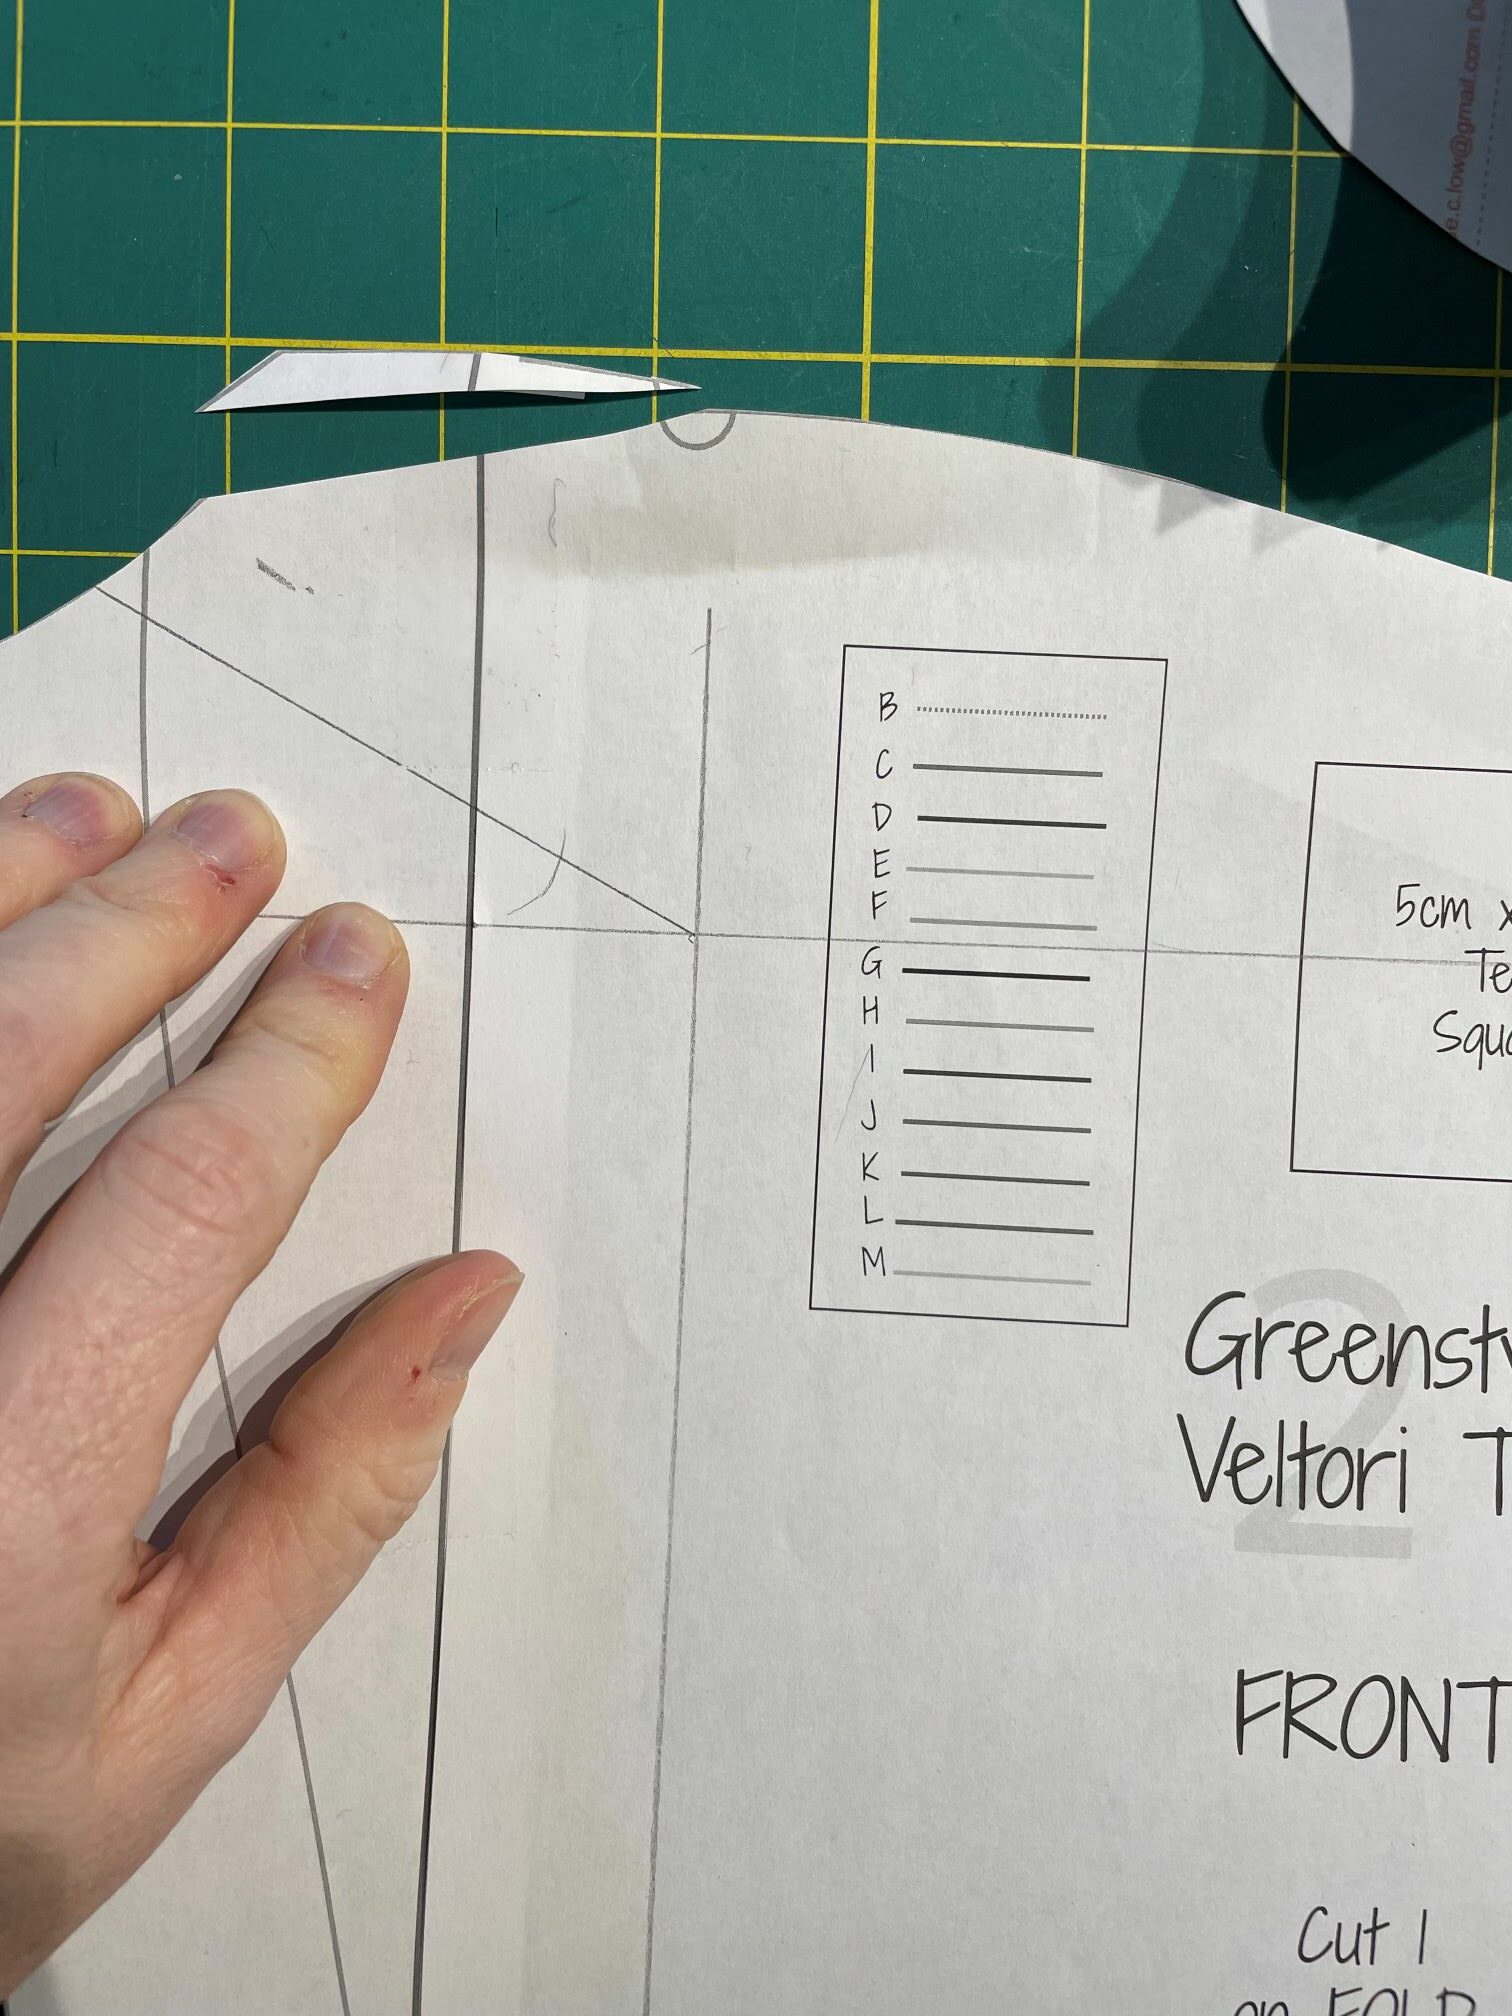
I’ve taken 2cm off the front of the collar and 1cm off the height by trimming away. I also slashed and shrunk the collar circumference to take out another ~0.75cm from each side. This should preserve that collar-sleeve seam angle well enough while changing the fit at the front neck where I needed it most.
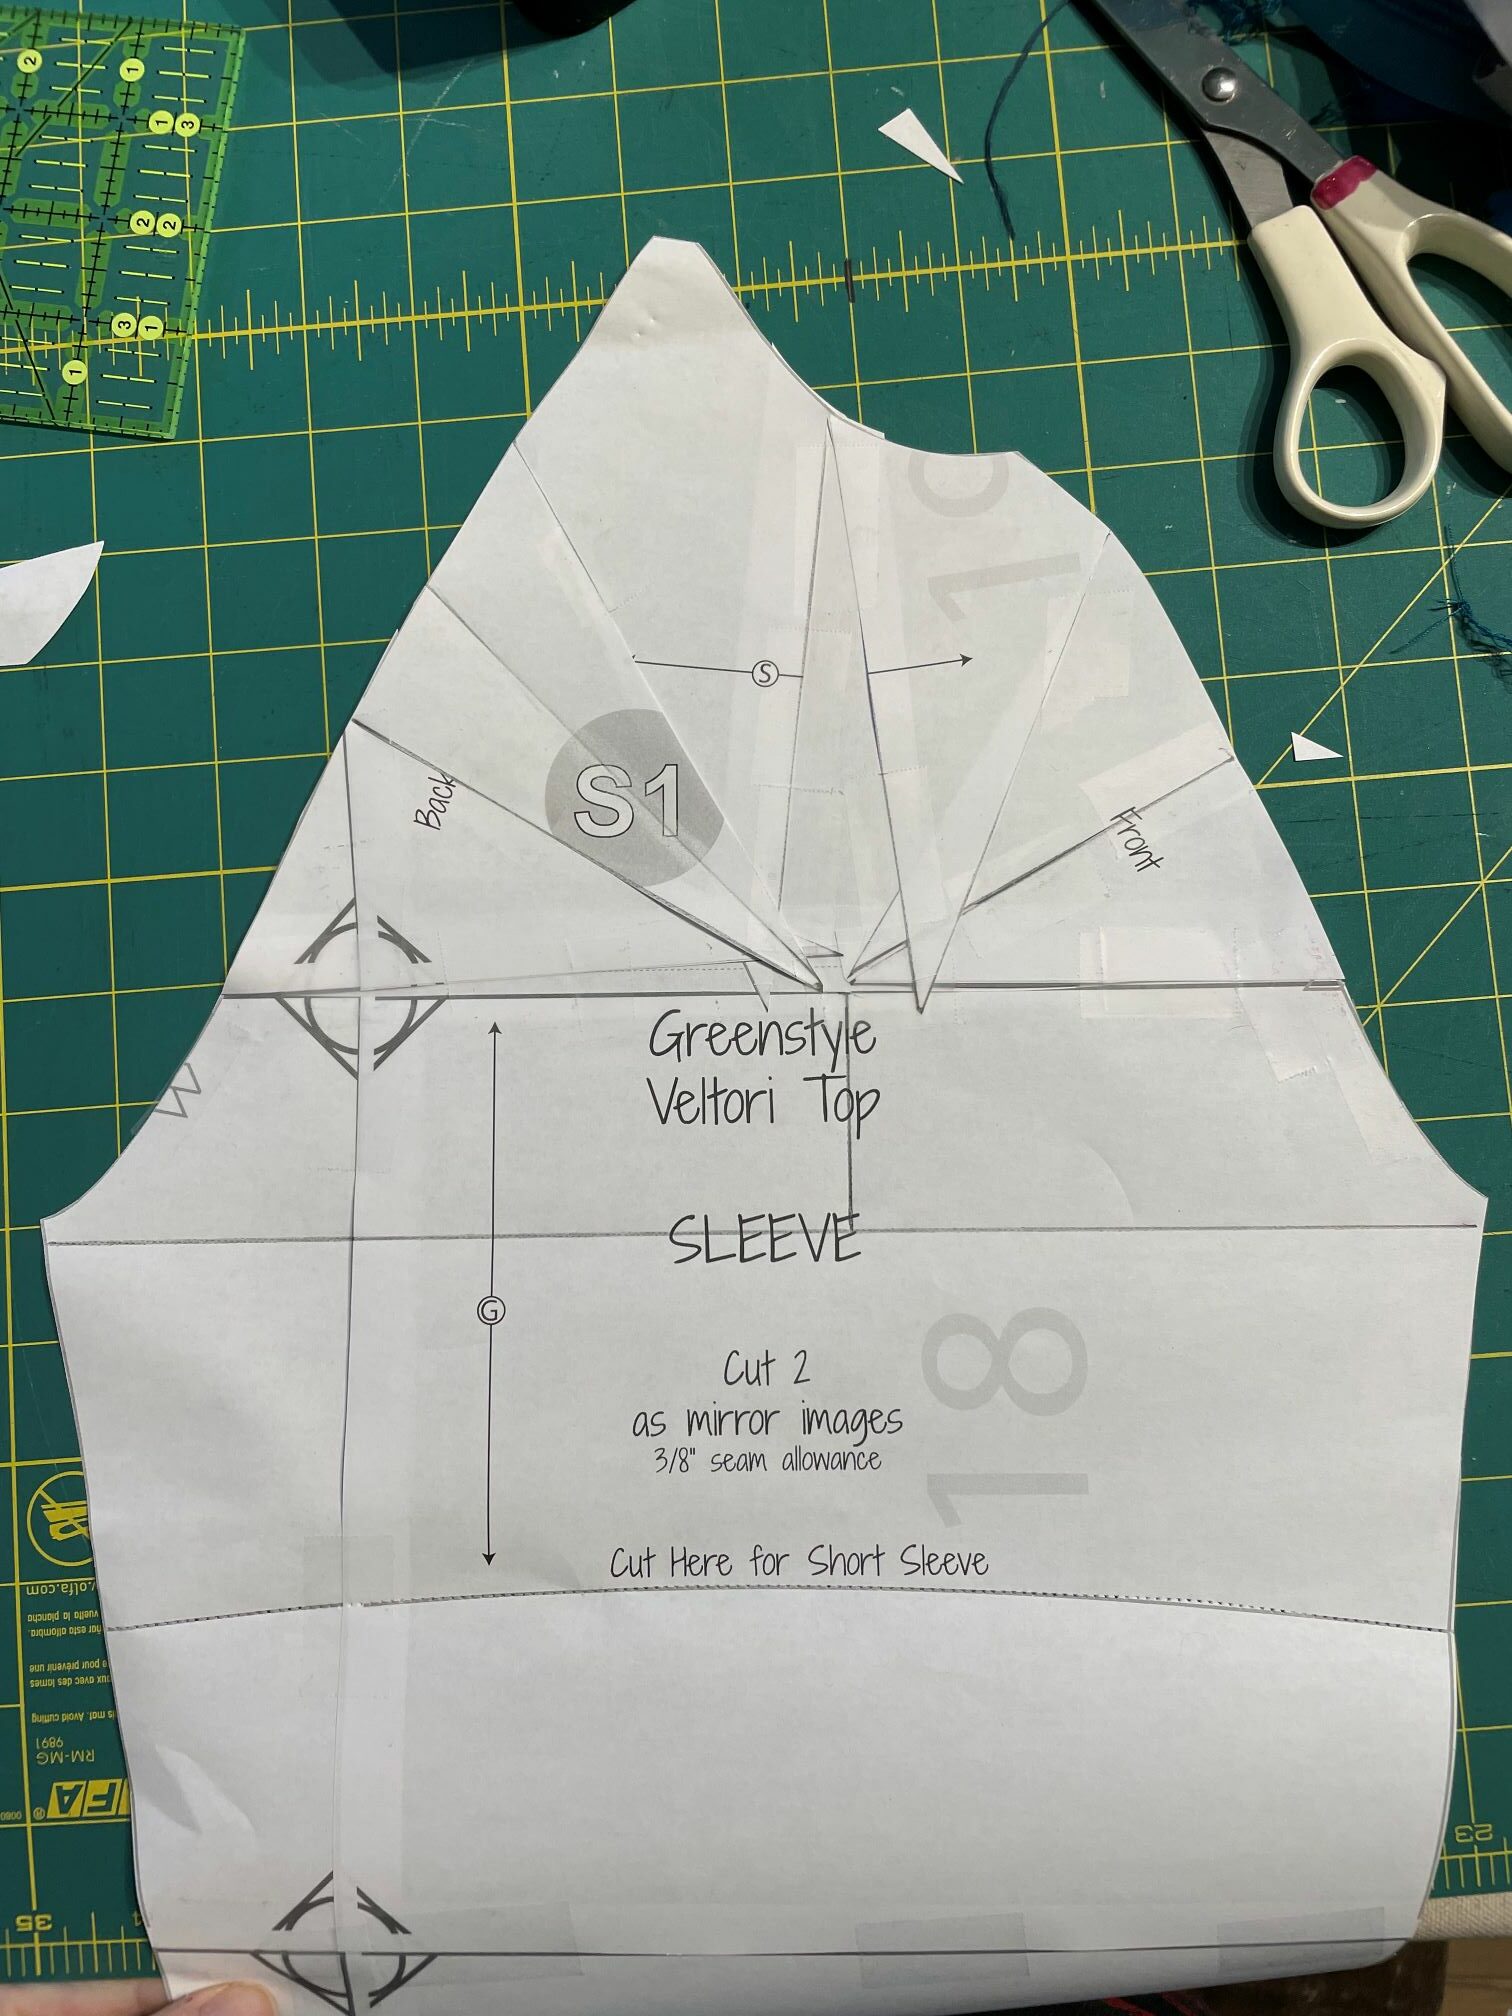
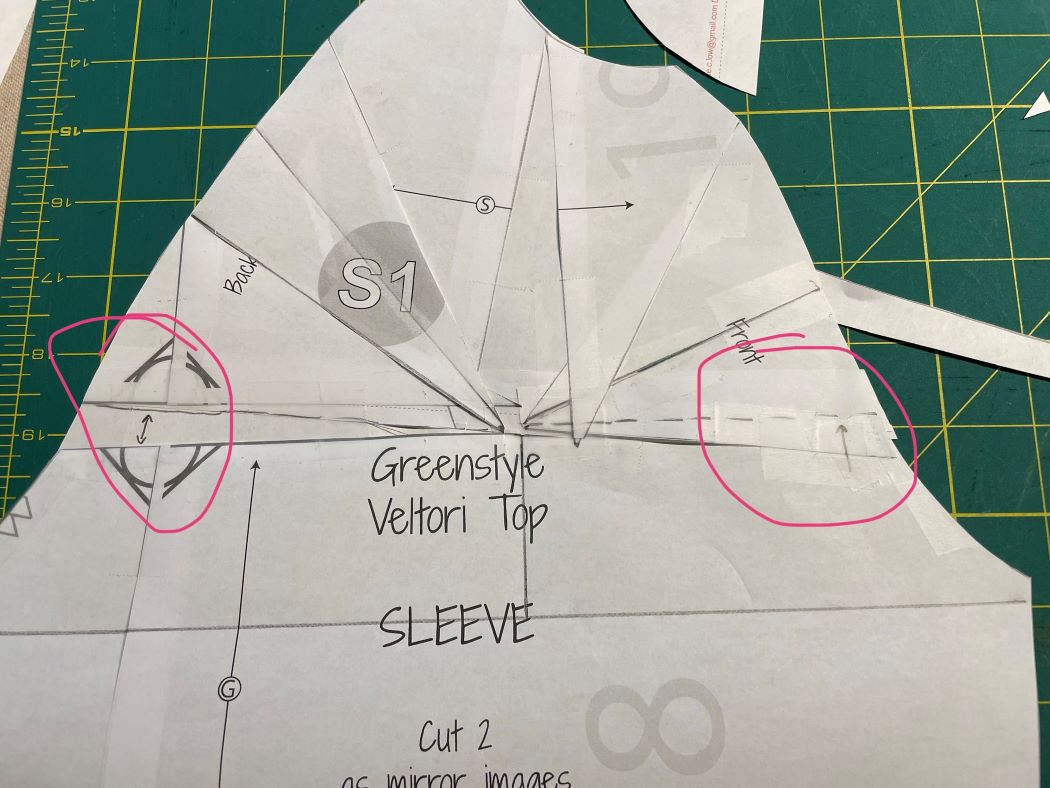
I did a broad shoulder raglan adjustment on the sleeve. This consists of picking a point on the shoulder 5.5″ down from the sleeve/collar seam (this matches my shoulder length measurement) and drawing a line perpendicular to the grain line across the whole sleeve cap. From the centre of this line, I drew additional lines at 30 degrees and 60 degrees out to the sleeve cap edge. I slashed along the horizontal lines and diagonal lines to within 2mm of the edge of the pattern piece, and then slipped scrap paper underneath. I gently pulled the sleeve seams outwards from centre, letting the various “pizza slice” shapes wiggle this way and that to give me the room I want. Then I taped it all down to the scrap paper underneath and cut off the excess around. This leaves the sleeve cap the same length as it was, so it’ll still fit into the armscye of the shirt, but also gives me about 2-3cm more room for my big girl shoulders.
After looking at the photos again and checking out the shirt’s fit on me, I decided I also want to do something more about the sleeve shaping. I have a “forward shoulder” situation going on, and between that and my bust, there’s a bunching up of fabric in my armpits that’s not so nice. To get rid of that, here’s what I did:
- Reshaped the lower outer corner of the front inset piece, taking about 0.6cm out of that bit.
- Shaved off about 0.6cm from the top of the “front” piece.
- Slashed the sleeve across the sleeve cap leaving a pivot point in the middle, the rotated the whole sleeve cap towards the front.
Collectively, these changes should get rid of some of that excess fabric at the front armpit and also give a little more room on the back armscye.
Otherwise, and not shown in photos: I’m going to shorten the upper back piece by 1cm at the bottom and taper that to about 0.5cm at the edge of the piece, then match that on the side back piece and taper it to no change at the lines where the side inset pieces would go.
And then I think I’ll add about 2-3cm in length all around, but I might cut that off once I’ve made up and tried on the next version.
The other thing I will do on the next version is cut off the top of the zipper so it’s only got about 3/8″ above the stopper. On this one I left it full length and it doesn’t hide well under the zipper guard. Also, I’ll use a zipper garage at the bottom so that I don’t have the zipper teeth in that front centre seam, because it makes it look kind of dodgy.
Speaking of next versions… I just found a BONUS 1m of Precious Metals breathe tek in my stash, hiding among the other prints. And I ordered some Breathe Mesh from Discovery this past week. SO you know what my next version is going to be made from! WHEEE!
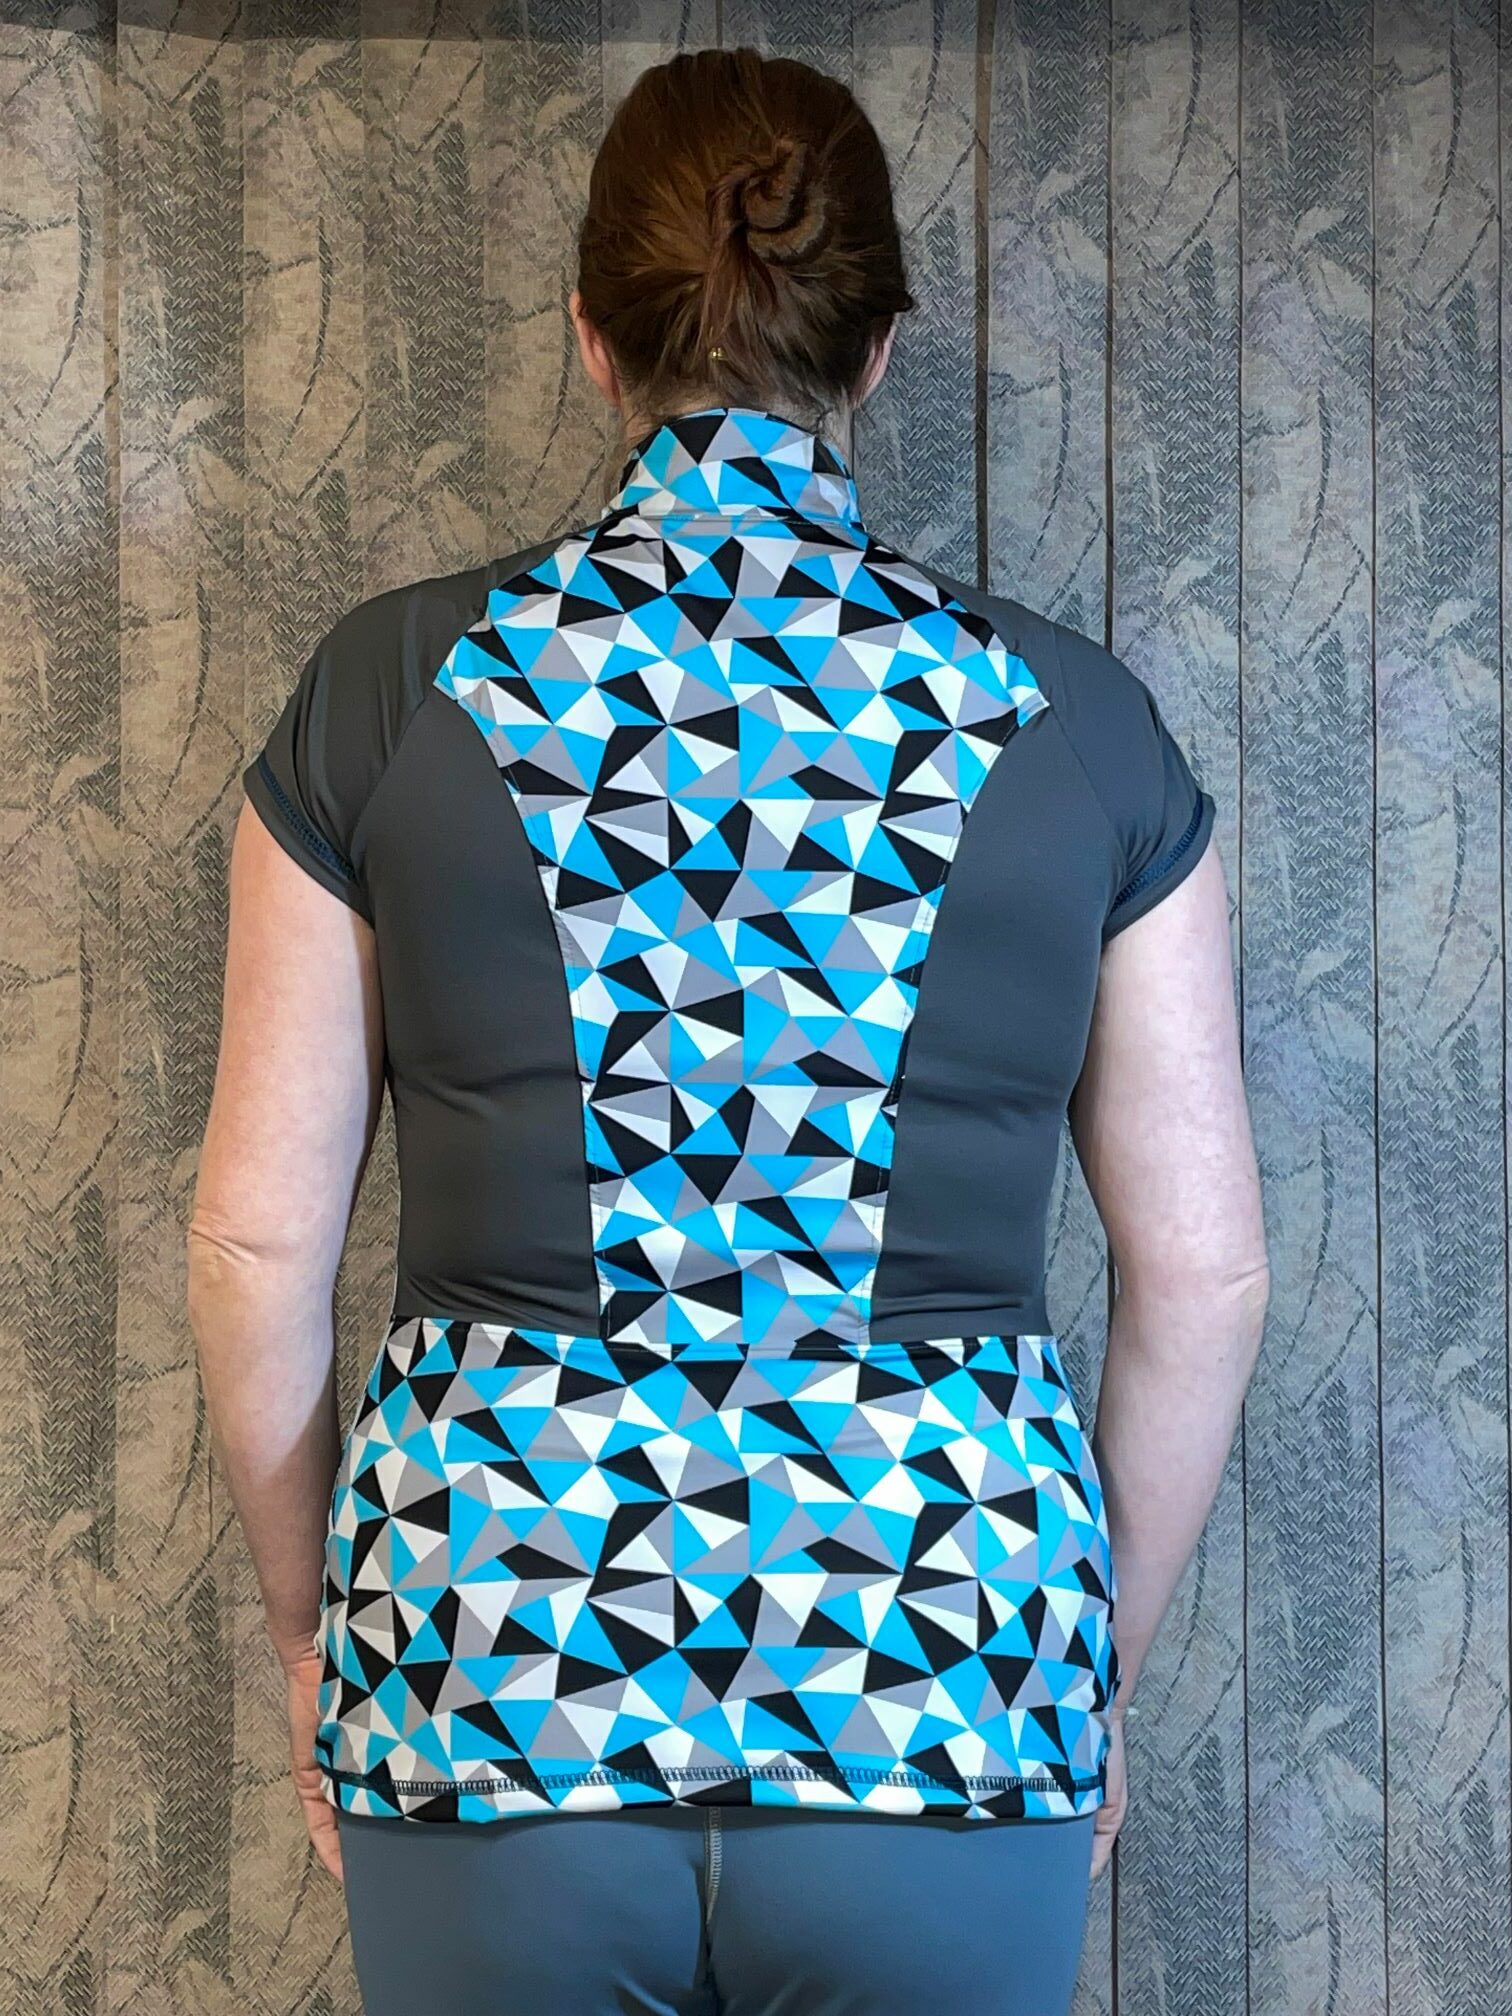
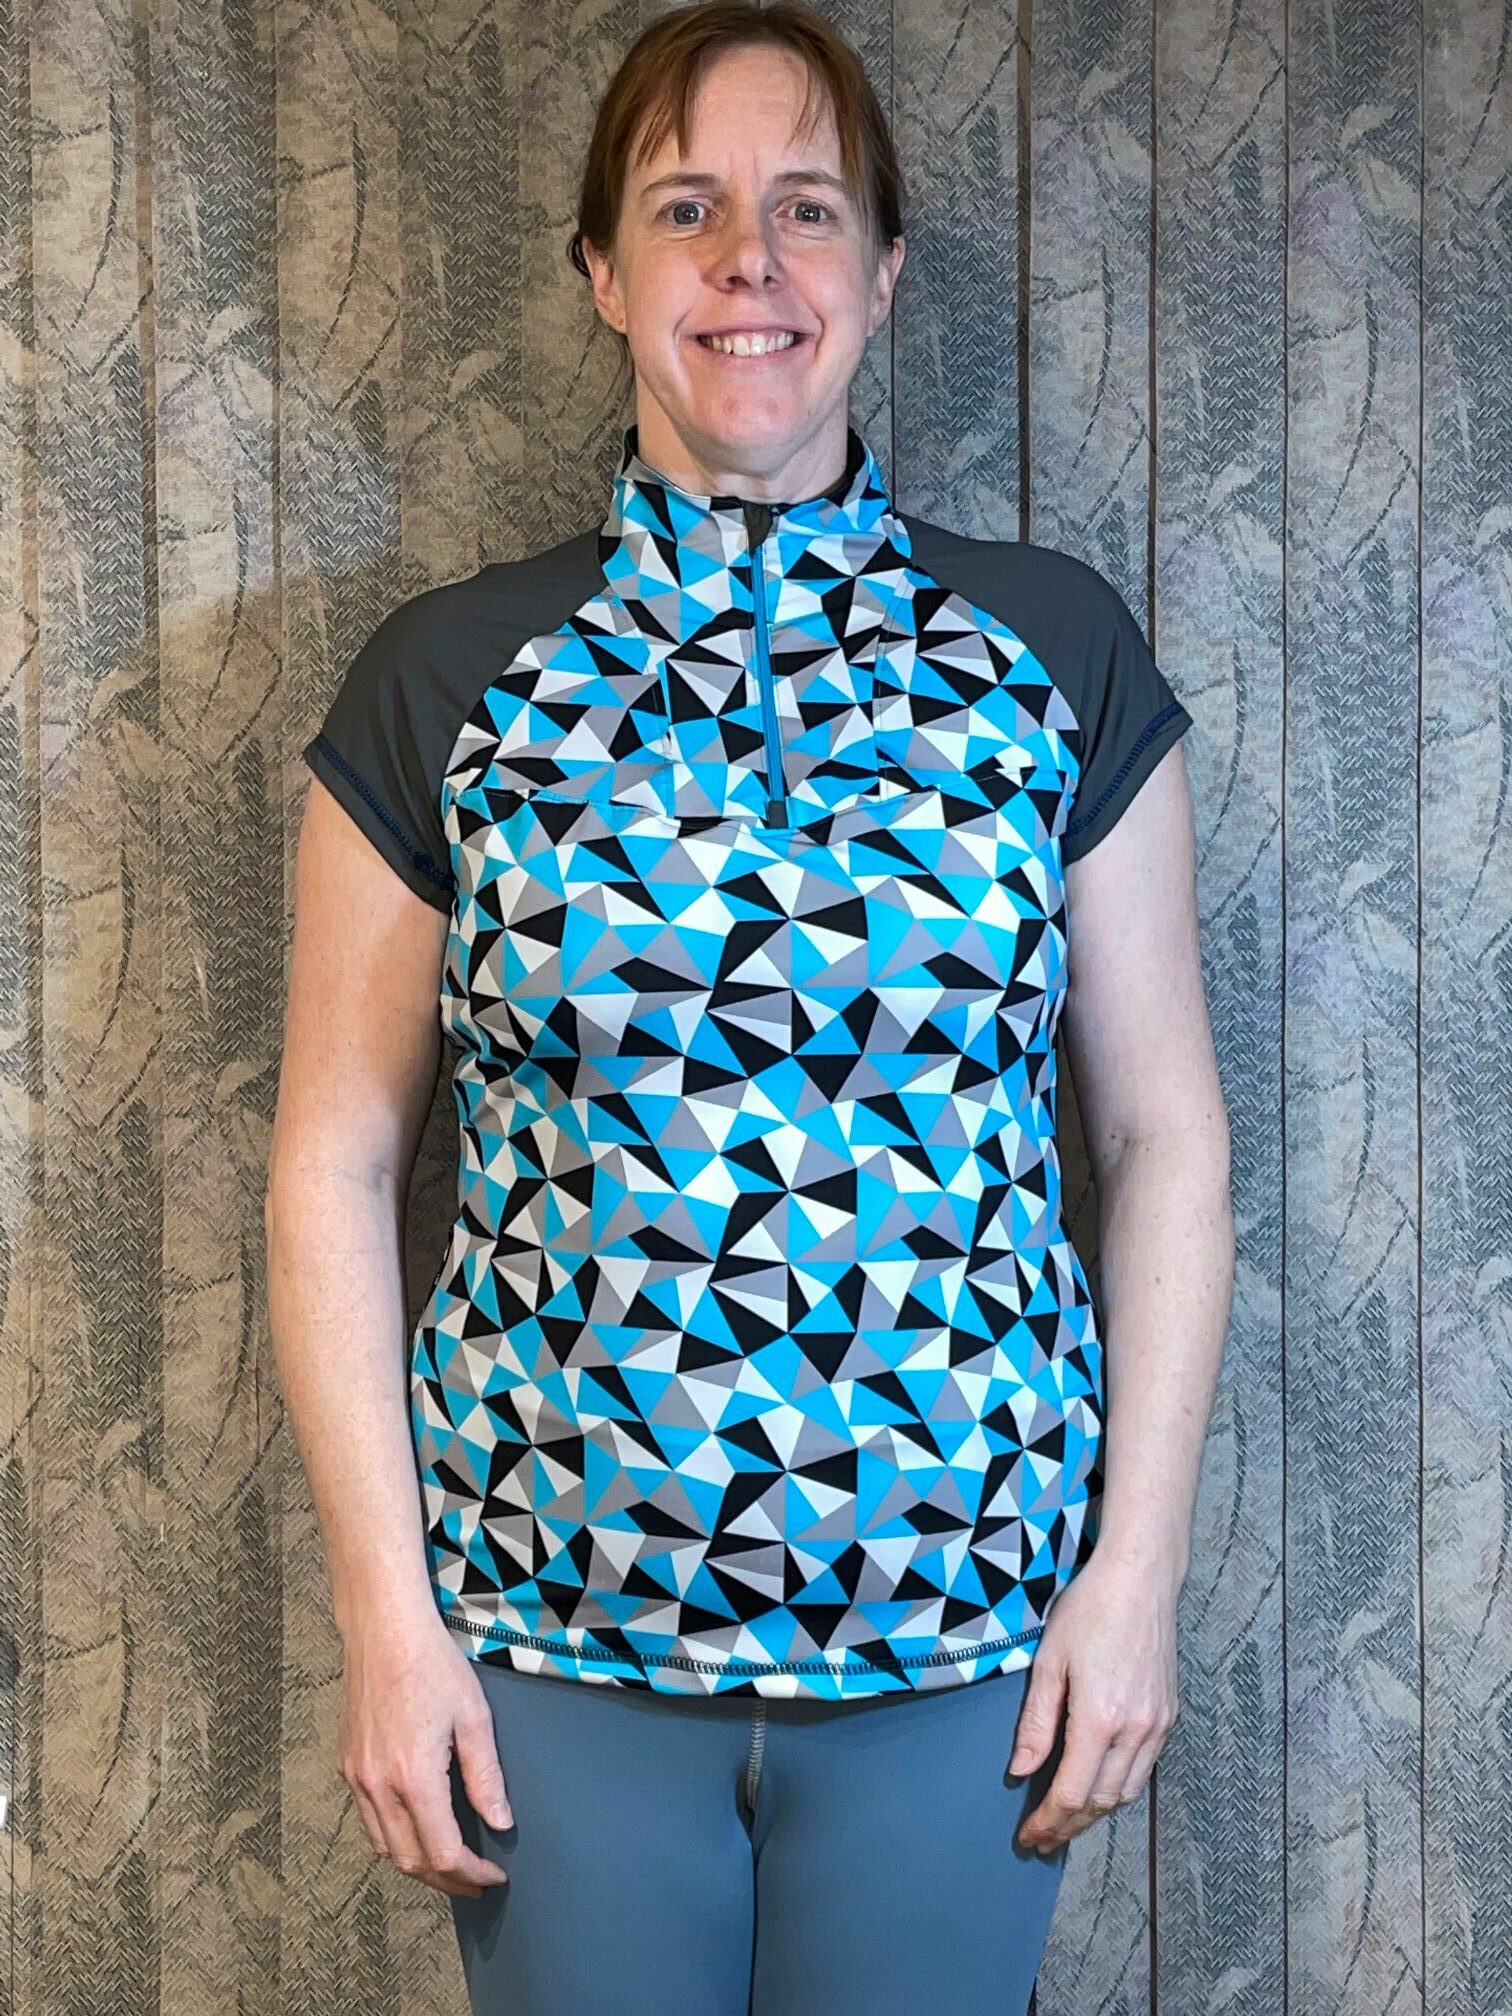
Version 2…
I dug out my remaining Precious Metals fabric and some scraps of slate blue Breathe Tek to go with it. Colour-blocking… not my best subject.
The front just makes it look like I tried to put cat ears on my shirt or something. Not a big fan of that. I think if you’re going to put a contrast in there, maybe it should be mesh or something that matches the sleeves.
On this version I also used the side inserts for more colour-blocking (honestly, why do I do this to myself?) and it results in a significantly looser fit. I don’t particularly care for that either, but it would give the opportunity to put side-seam pockets in there and make this into more of a 2nd layer, whereas I think the basic fit is more of a base layer.
I do think that the collar changes I made were pretty much right. If the collar was any tighter, it would feel constricting. I find that with this zipper guard, there’s a lot going on at that front neckline and it feels heavy. Maybe for the next version, I’ll use a really lightweight fabric for the zipper guard.
I still have quite a lot of excess fabric in the front armpit, and the sleeve hem sticks out funny. As I have run out of ideas or energy for fixing this top tonight, I’m going to call it a night and maybe some brilliant idea will strike me overnight. Too bad — tomorrow, I’ll be doing family brunch and then going to visit my dad up Island, so no day-long sewing session for me.
I’m kind of stumped now… I want to make this top for my Wardrobe Sudoku grid, but I don’t think it’s well suited to the Breathe Tek Athletic. I think it would be better in a lighter weight fabric – the chitosante extreme I used for the first version was better than this version, by a bit. They’re both 250gsm though. I’ve seen Angelskin used successfully – it’s not much lighter at 238gsm, but that and the chitosante seem to be less structured than breathe tek. I’m starting to think that breathe tek is really best used for leggings and very tight shirts.
Ugh… further edit: I just realized that I forgot to take the extra off the front piece that you’re supposed to cut off when you’re using the side insert. That would explain the vastly different fit. Take back everything I said above. But I’m calling it a night.
Version 3
Calling it a night? NOT SO MUCH! Hahaha.
My mom is delighted to be gifted the 2nd version of this top. The first version is wearable and comfortable. Here’s version three…
For this one, I used lightweight scuba and I think this is a much better weight for this top. The zipper doesn’t end up feeling quite so burdensome.
I shaped the sleeve hemline so it rises 2cm up in the middle, and that gets rid of the pokey-outey bits somewhat, but I don’t think that this sleeve length is particularly flattering on me. It either needs to be a proper cap sleeve, or a longer sleeve (like elbow length), I think.
The upper back could stand to be a mite bit wider. I also think that the way the seamline dips down in front in between the bust apexes is not so good. You really can’t have a curving seam AND a zipper AND a zipper guard going right across that zone. Unless maybe I need a bit more width across the front at the bust, but I don’t think so.
I’m getting pretty good at the construction though. This one was done in just about two hours, from cutting to hemming. NOT trying to use the coverstitch for all the topstitching made it considerably less frustrating, and considerably faster.
Okay, NOW I’m calling it a night.
A bonus metre of precious metals?!?! Fantastic!!! I don’t know what it is with my shoulders lately, buts one times I do a square shoulder adjustment and sometimes a forward shoulder – maybe I should just start doing BOTH. Right off the bat… o love a raglan sleeve when I can get it to fit me properly 😊
This pattern will definitely go on my PDF patterns I covet list – thank you for so many details! 👍
That is a tonne of sewing on one day! I really like your first and last version and if you found a happy recipient for the second one that is great. Thanks for your detailed review of the fabrics and pattern.